The FEP film is a consumable – and a good rule of thumb is to replace them every 40 or so prints, or whenever there is noticeable scratching, denting or deformation. Otherwise, you run the risk of a puncture letting resin seep onto your LCD screen during a print – where it will cure and harden. Scraping it off could damage your LCD screen, which will mean a very expensive replacement instead of the very affordable replacement your FEP film would have been.
What You’ll Need:
- FEP Film that fits your printer (if in doubt, bigger is better because you can always trim away the excess during installation)
- Allen keys or the necessary tools to remove your resin vat’s screws
- A hobby knife, boxcutter, scalpel or sharp knife
- Paper towels for clean up
- Plastic gloves (for handling anything resin related, as usual)

1. Elegoo Mars 4 FEP Film
Elegoo is a safe bet. Ideal for Mars 4 and similar size 3D printers.

2. FEP 2.0: Elegoo Saturn 2 and 3
Elegoo’s latest range which according to them lasts 50% longer than regular FEP. Good for Saturns, or equivalent machines of different brands (8.6 inch or below).

3. Sovol Saturn/Photon Mono/Qidi S
This is the brand I use typically, it’s very affordable. Serves 8.9 inch 3D printers.
Installing FEP Film:
While relatively straightforward, the tightness and “give” of the FEP film definitely matters for printing. Follow on below for a more precise overview on what FEP film replacement entails.
When handling the resin vat, you should also take the usual precautions such as wearing disposable gloves.
FEP Film Replacement Process: Step-by-Step
Time: 15 minutes or less

Step 1: Unscrew the resin vat from your printer
And while you’re at it, check for any resin on the LCD screen.
Step 2: Measure the FEP Tension
I recommend before you start undoing anything, determine the tightness or “give” of your FEP film for your specific 3D printer before you remove this old FEP and lose access to this information!
The tightness of your printer’s FEP film is left oddly obscure by not only most FEP film producers, but also many 3D printer manufacturers.
A great trick is to use playing cards. I have a guide on how many playing cards to use for replacing FEP film on Elegoo Mars 3D printers, as well as Elegoo Saturn 3D printers. These should be interchangeable for their Anycubic counterparts of the same dimensions, such as for the Anycubic Mono X FEP film, but I would recommend you use the method below the table to be sure.
| Resin 3D Printer | FEP Film Replacement Tension | Recommended FEP Dimensions |
|---|---|---|
| Elegoo Mars | 32 playing cards | 140*200 mm |
| Elegoo Mars 2 or Mars 2 Pro | 32 playing cards | 140*200 mm |
| Elegoo Mars 3 | Not tested | 146*195 mm |
| Elegoo Saturn (1, 2, 3 & 4) | 54 playing cards | 200*260 mm |
| Elegoo Saturn S | 54 playing cards | 200*260mm |
| Anycubic Photon | 32 playing cards | 140*200 mm |
| Anycubic Photon S | 32 playing cards | 140*200 mm |
| Anycubic Photon Mono X | 54 playing cards | 200*260mm |
| Epax X1 | 32 playing cards | 140*200 mm |
Resin Printer Not Listed?
If your printer isn’t listed above and you can’t find this type of information readily from your manufacturer, try this:
Before you remove your FEP film, place some playing cards under it. Keep building up the deck until it is difficult to impossible to hold the plate down flat with that number of cards underneath. When you reach roughly flush contact with the table, you have a good idea of how much give the FEP film for your printer needs.
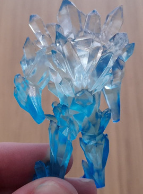
Above: Example FEP film tension once removed from the resin vat.
Other Ways to Measure FEP Tension
For a less specific tension, but a quicker process, another option is to place a soda bottle cap beneath the FEP during assembly.
Step 3: Remove the First Layer of Screws
Turn the resin vat upside down and remove the first layers of screws using either an allen key or other recommended tool for your 3D printer. For most 3D printer models, such as the Elegoo and Anycubic ranges, allen keys of the correct dimensions should have come pre-supplied with the box.
Step 4: Remove the Second Layer of Screws
For most resin 3D printers, expect there to be a second layer locking the FEP into place. Removing this should see you with two frames, and the release of the FEP film that was wedged between them.

Step 5: Get Your New FEP Ready
This just means make sure you peel off any protection film before usage. Try not to touch the FEP release film on either side, as this can reduce its efficacy.
Step 6: Measure The FEP Tension
As per the guide in step 2, ensure you install your FEP with the necessary tension. See the image below.
However you measure the tension, such as with 32 playing cards for an Elegoo Mars 2 Pro or 54 playing cards for an Elegoo Saturn, gently hold the frames flush with the table with the playing cards underneath the FEP before securing the screws back in.

Step 7: Replace the Screws and Resin Vat Frame
While some FEP comes with holes already, most FEP film comes without them and the assembly process will punch them in as you go. Replace the screws through your FEP either way, making sure you keep the playing cards or other tension-measuring apparatus underneath it until the very end.
You can also replace the rest of the resin vat such as the frames.
You’ll notice at this stage that the FEP gets much more taut as the screws tighten.

Step 8: Cut Away Excess FEP
Final step. Lean a scalpel or other sharp blade into the resin vat’s sides to slice away any overhang. Now it goes without saying that you should be very careful not to pierce your FEP film…or you’ll be heartwrenchingly dragged back to step 1.
Shy of any mishaps, you’re done.
Why is my FEP Film getting scratched?
The biggest culprit of a scratched FEP film is failed prints. Most frequently, the issue is the little bits of hardened resin that get left behind unknowingly in the liquid resin and get crunched the next time the build plate moseys on down for a print job.
To avoid this, you should always filter your resin out between failed prints. I use the below left metal funnel with in-built filter, but you can also use something like paper filters (you may even have a few supplied with your 3D printer).
Another typical issue is rough cleaning. A swipe of the spatula can easily result in scratches, as can levering a print off the FEP film if any parts got stuck during the printing process.
And finally, it’s important to remember that a FEP film is a consumable – so they will degrade naturally from wear and tear over time. They will also likely get scuffed during completely standard printing processes.


How long does FEP film last?
With care, FEP film can easily last for 30-50 prints, with 40 being a good rule of thumb. Emerging FEP films may also break this rule. For instance, Elegoo’s new FEP range boasts 50% greater lifespan than its predecessors. That said, you should immediately replace your FEP film if you see any of the following:
- Dents
- Severe scratching
- Warping
- Punctures
Even if these somehow don’t result in resin getting through onto the LCD screen, they can impact your 3D prints and even cause them to fail. There’s a reason that a common step in print fail troubleshooting is to change the FEP film.
Dents aren’t the only limiting factor on a FEP film’s lifespan. Over several uses, the tightness and snug fit of the FEP film can be undermined, which affects your print quality or success rates once again.
Personally, I don’t rush out to replace the FEP if I see the following unless I start to experience failed prints:
- Minor scratching
- Minor cloudiness
It is worth noting that over time, working 3D printer settings may need to be adjusted to keep working on an old and worn FEP. Exposure times, lift height and print speed are all impacted by your FEP – so while a FEP still in good nick may withstand a certain print speed, an old FEP may require a reduced speed to get the same prints. Print settings are a pain, and it’s likely just easier to change out the FEP.
When to replace FEP film
Here is a summary of when to replace your FEP film:
- Your FEP has any dents, deep scratches, warping or of course, punctures
- You’re experiencing an unusual rate of failures you can’t account for
- Your FEP has been used for over 40 prints and you don’t want to start adjusting print settings for lost tautness, smudging or wear and tear

How to Remove Failed Prints Without Damaging Your FEP
The easiest trick is to remove the resin vat and gently push your thumb on the underside of your FEP to exert pressure beneath the failed print. The difference in tension should help the failed print pop right off.
How to clean FEP Film
Remove Liquid Resin
Remove any liquid resin from the resin vat, ensuring you use a filter such as the ones above to remove any residue cured resin if you decide to pour this resin back into its bottle.
Paper Towel Residue
Next, use something soft and absorbent such as a paper towel to absorb any residue liquid resin in the vat.
Warm Soapy Water and Dry
Finally, while I usually get away with just padding the corners with a paper towel, you can use warm, soapy water for a deeper clean and to help mitigate any cloudiness. You can then dry it off with a microfiber cloth. Generally speaking, microfiber cloths are your solution to most things you don’t want to damage. There’s a reason they’re used on vehicles!
Deep Clean
You can use Isopropyl alcohol (or IPA) for an even deeper clean, but you must follow this up with either water or thinned window cleaner to reduce the stickiness in the aftermath. It may seem minor, but aspects such as stickiness can have implications for the 3D printing process when the build plate tries to pull the next print off the FEP.
FEP film lubrication
If you’re having trouble with prints sticking to the FEP for any reason, this can be calibrated by lubricating the FEP film. While some experts will say that a “well-oiled machine” as it were shouldn’t need lubrication, the fact remains that there are so many confounding factors that can cause a 3D resin print to fail. From temperature, to storage conditions, to FEP age and installation to your printer settings and resin brands or types. If lubricating the FEP helps decrease print failures, go for it.
The best lubricant to use is PTFE. It was trickier to source in Australia, but this is the one I have used on occasion – primarily for larger prints where I’m worried about suction. PTFE on FEP film is pretty tried and tested as a whole, and it won’t damage your FEP.

Sometimes this is out of stock in Australia, in which case you can try Bunnings or order it from Amazon US with options like this:
How to clean your LCD Screen if resin has leaked onto it
Sorry that happened to you. One of the most frustrating jobs because all of the ways of getting cured resin off the screen can also damage the screen.
Prepare to spend a bit of time and patience, with the best way in my experience being to utilise the plastic scraper or spatula most printers come supplied with. I would never use the metal one.
Use some warm water, or in very small doses you can apply a cloth with some Isopropyl alcohol. It’s worth noting that the alcohol is actually bad for the screen, so do this very sparingly and wipe it away as you go.
Somewhat gentle but persistent scraping of the hardened resin will generally get it off over time. It may feel like you aren’t getting anywhere at first, but keep at it. It’s a chore.
Is a Screen Protector Worth It?
Honestly? Yes, they are. I was put off by the $50 for a long time, but the LCD screen is the most expensive part of your 3D printer. Never mind the ordeal of changing it out. I at the very least use them for all of my printers of Saturn or Mono X size or greater.
If you ever pierce your FEP midway through a print, and resin seeps onto the screen, it will cure there during printing and be a huge pain to remove.
If this has already happened to you, read my advice for cleaning it off above.
If it hasn’t, consider yourself lucky and always check your FEP periodically to ensure there aren’t any dents or scratches tempting fate. It is also worth taking the precaution of inspecting the underside of your resin VAT between every few prints or whenever you’ve had a failed print to ensure there are no major scratches or dents, and to check that the LCD screen is still clear.
There are a few variations of screen protection available if you do decide to make the investment, but in the end I went with tempered glass film. Specifically, this is the one I settled on for my Saturn printer (8.9 inch) and it has so far done an excellent job of allaying my concerns:

1. Tempered Glass Film – 8.9 inch Saturn or Photon Mono
My first choice.

2. Photon, Saturn, Epax, Proxima (8.9″)
A bit too expensive for my tastes, but generally well-reviewed.

3. Soft Screen Protectors – Multiple Sizes
Go through their options to find your printer size.
To Sum Up
FEP film replacement should be quick and easy. The only part to really think about is the FEP tension, and this differs by resin 3D printer.
If in doubt, search YouTube for a video from your manufacturer for that specific machine, or simply reach out to your manufacturer directly.
If you do make a mistake, don’t worry about it – FEP film is among the cheapest and most routine replacement parts.
And if you’re changing your FEP due to print failures, make sure to also level the build plate and clean all equipment to help rule anything out via process of elimination.
Here’s hoping you get back to printing soon.